Page creation
To create a new page, the following steps are necessary:
Creating a new page under
lib\obp60task\PageXXXX.cppRegister the page in [
lib\obp60task\obp60task.cpp. Extend the functionregisterAllPagesaccordingly.In
/lib/obp60task/config.json, add the new page to the respective page lists or add the page to/lib/obp60task/gen_set.pyand thus recreate the relevant part of the file/lib/obp60task/config.json.
The existing page PageDigitalOut.cpp can be used as a template for a new page. It contains minimal code and demonstrates the typical use of the graphics and display functions. In the copied page, simply replace all text lines PageDigitalOut with PageMySample and save the file as PageMySample.cpp. All created pages must follow the schema PageXXXX.cpp.
Access to data
For some pages, the source code specifies which values to use:
int displayPage(PageData &pageData)
{
  GwConfigHandler *config = commonData->config;
  double value1 = 0;
  // Get boat values for Keel position
  value1 = commonData->data.rotationAngle; // Raw value without unit convertion
Alternatively, both fixed values and values configurable via the web interface can be specified in the page description. These are available within the page as pageData.values[i], with the web-configurable values appearing before the fixed values.
int displayPage(PageData &pageData){
  GwConfigHandler *config = commonData->config;
  // Get config data
  GwApi::BoatValue *bvalue1;
  // Get value for AWA
  bvalue1 = pageData.values[4];
    ....
}
PageDescription registerPageWindRoseFlex(
  "WindRoseFlex", // Page name
  createPage,     // Action
  4,              // Number of bus values depends on selection in Web configuration
  {"AWA", "AWS", "TWA", "TWS"},    // fixed  values we need in the page. They are inserted AFTER the web-configured values.
  true            // Show display header on/off
);
Data presentation
How the strings are generated from the raw data is defined in OPB60Foramtter.cpp, which also specifies the conversions to different units. As follows, any existing calibration can first be applied to the value, and then a string can be generated in the selected units and according to the chosen formatting specifications:
// Check if boat data value is to be calibrated
calibrationData.calibrateInstance(bvalue1, logger);
// Formatted value as string including unit conversion and switching decimal places
String svalue1 = formatValue(bvalue1,*commonData).svalue;
// Unit of value
String unit1 = formatValue(bvalue1,*commonData).unit;
A font from the DSEG7 family is typically used to display the values. A special feature of this font is the width of its characters. Spaces, periods, and colons are much narrower than the digits. For a digit where none of the seven segments are displayed, the character ! is used. This allows for the creation of spaces that are exactly as wide as a digit. Therefore, in OBB60Formatter, when displaying values with two digits (i.e., one decimal place for numbers under 10 and two digits without a decimal place for numbers between 10 and 99), the number is right-aligned as follows:
if (precision == "1") {
  //
  //All values are displayed using a DSEG7* font. In this font, ' ' is a very short space, and '.' takes up no space at all.
  //For a space that is as long as a number, '!' is used. For details see  https://www.keshikan.net/fonts-e.html
  //
  fmt_dec_1 = "!%1.1f";  //insert a blank digit and then display a two-digit number
  fmt_dec_10 = "!%2.0f"; //insert a blank digit and then display a two-digit number
  fmt_dec_100 = "%3.0f"; //dispay a three digit number
} else {
  fmt_dec_1 = "%3.2f";
  fmt_dec_10 = "%3.1f";
  fmt_dec_100 = "%3.0f";
}
If a different font is to be used for display on a page, the formatting on the page itself must be based on the numerical value to prevent the output of exclamation marks.
Configuration values
Sometimes it’s necessary to configure certain settings via the web interface. Variables are assigned a value at the software’s startup time, which the user can then modify via the interface. These configuration values are defined in a JSON configuration file named config_obp60.json. A typical entry for a configuration value looks like this:
{
  "name": "waterTank",
  "label": "Water Tank [l]",
  "type": "number",
  "default": "0",
  "check": "checkMinMax",
  "min": 0,
  "max": 5000,
  "description": "Water tank capacity [0...5000l]",
  "category": "OBP60 Settings",
  "capabilities": {
        "obp60":"true"
  }
},
    {
    "name": "batteryVoltage",
    "label": "Battery Voltage [V]",
    "type": "list",
    "default": "12V",
    "description": "Battery Voltage [12V|24V]",
    "list": [
        "12V",
        "24V"
    ],
    "category": "OBP60 Settings",
    "capabilities": {
        "obp60":"true"
    },
             "condition": [
        { "battery": ["available"] }
    ]
},
The file config_obp60.json contains a variety of configuration values. The meaning of these values is described below.
Name: Variable name in the program (lowercase, max. 12 characters)
Label: Variable name in the web configuration interface
- Type: Type of variable
Number: Numerical value
String: Text value
List: List of selection values
Default: Default value of the variable
- Check: Test instructions
CheckMinMax: Check variable values for minimum and maximum values and limit them if necessary.
Min: Minimum value
Max: Max-Wert
Description: Description text (the combination n creates a line break)
Category: Category in the vertical menu structure (created automatically if not already present)
- Capabilities: Display option for different hardware versions
“Obp60”:”true”: Only display if capability for obp60 is defined in file
obp60task.h
- Condition: Display condition (AND-linked for multiple entries)
“Battery”: [“available”]: Only display if variable batery has the value available
Display of graphical content
Both text-based and graphical elements can be placed on the display. The foundation for these operations is provided by the GFX graphics library. This library was initiated by Adafruit to enable a uniform command set for addressing a wide variety of graphics displays. Many display driver manufacturers base their designs on this library and have made their own adaptations, which are largely identical to the command set. However, there are some limitations for the e-paper display, and not all commands of the Adafruit GFX library are available.
This PDF-Dokument contains the basic commands of the Adafruit GFX library. You can also access the complete functionality of the library online here Klassen Referenz.
The coordinate system of the graphic display is organized so that the origin is located in the upper left corner. All coordinate values refer to this origin.
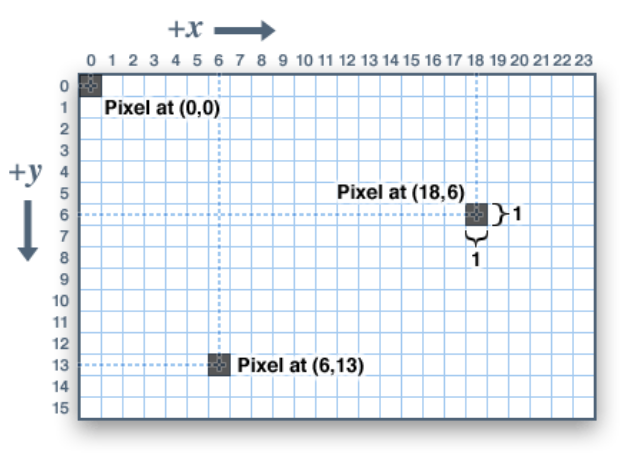
Fig.: Coordinate system
The project uses the helper function getdisplay(), which contains all GFX commands. The following descriptions of the graphics functions apply to both the black and white e-paper display and the color TFT display and can be used interchangeably. Depending on the display type, the colors are displayed in monochrome or color.
Color space
The color space for graphics displays follows the RGB565 color scheme. In this scheme, 16 bits are allocated to the respective colors blue, green, and red. The color resolution for green is one bit higher than for red and blue. This allows for significantly better reproduction of mixed colors despite the lower bit count. The RGB565 color scheme can represent 65,536 different colors. For small microcontrollers, the RGB565 color scheme offers a good compromise between hardware requirements and the level of detail in color reproduction and is the most widely used color standard in this area. PCs, on the other hand, typically use the RGB888 color scheme, which can represent up to 16,777,216 colors. Those who would like to learn more about RGB-Farbschema can find further information in this description.

Fig.: RGB565 color scheme
The 16 bits of the color scheme are divided into two bytes: a high byte and a low byte.
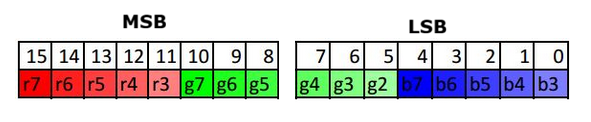
Fig.: RGB565 High and Low Byte
These two bytes define the color of a pixel. The following table shows examples of the HEX color code and color name for some colors.
// TFT color definitions
#define BLACK 0x0000
#define BLUE 0x001F
#define RED 0xF800
#define GREEN 0x07E0
#define CYAN 0x07FF
#define MAGENTA 0xF81F
#define YELLOW 0xFFE0
#define WHITE 0xFFFF
There are many more color names, which can be found in this Farbtabelle. The e-paper display has two separate color names.
// EPD color definitions
#define GxEPD_BLACK 0x0000
#define GxEPD_WHITE 0xFFFF
The color selection on the display pages is centrally controlled as follows. The current colors to be used in the display are stored in commonData. fgcolor and bgcolor define the foreground and background colors, which can be selected centrally in the web configuration (normal or inverse display). The colors are always based on black and white to ensure consistent display across different screen types.
getdisplay().setTextColor(commonData->fgcolor);
Text
getdisplay().setFont(Arial);        // Set text font
getdisplay().setTextColor(color);   // Set text color
getdisplay().setCursor(x, y);       // Set cursor for text position
getdisplay().print("A");            // Print text
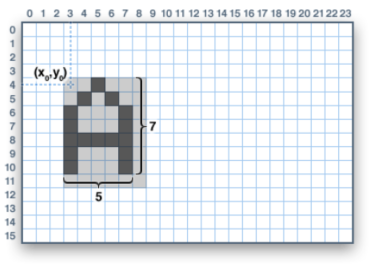
Fig.: Placement of a character
Line
getdisplay().drawLine(x0, y0, x1, y1, color); // Draw single line
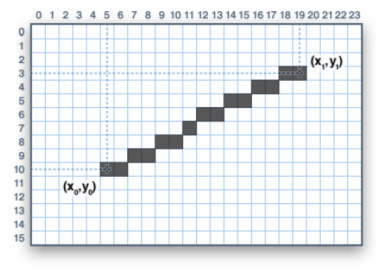
Fig.: Line
Square
getdisplay().drawRect(x0, y0, width, hight, color);     // Draw rect
getdisplay().fillRect(x0, y0, width, hight, color);     // Draw filled rect
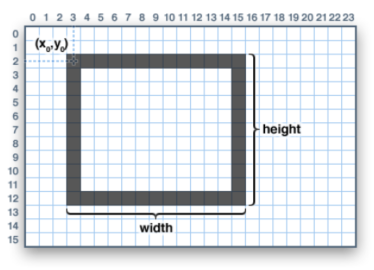
Fig.: Quadrilateral
Rounded square
getdisplay().drawRoundRect(x0, y0, width, hight, radius, color);        // Draw round rect
getdisplay().fillRoundRect(x0, y0, width, hight, radius, color);        // Draw filled round rect
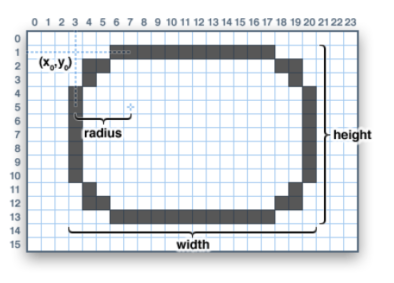
Fig.: Quadrilateral with rounded corners
This function is very useful for drawing control buttons. It has been used to create a further function that allows control buttons to be displayed.
Triangle
getdisplay().drawTriangle(x0, y0, x1, y1, x2, y2, color);       // Draw triangle
getdisplay().fillTriangle(x0, y0, x1, y1, x2, y2, color);       // Draw filled triangle
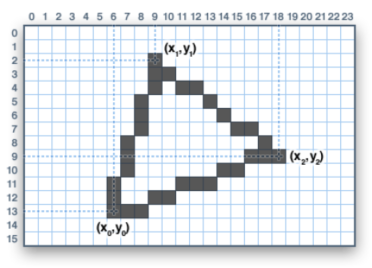
Fig.: Triangle
Circle
getdisplay().drawCircle(x0, y0, radius, color); // Draw circle
getdisplay().fillCircle(x0, y0, radius, color); // Draw filled circle
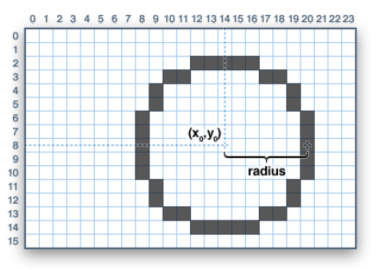
Fig.: Circle
Picture
The following command displays images as 1-bit black and white images. The color parameter sets the color of the active pixel. For an e-paper display, this is black or white, and for a TFT display, it can be any color. This makes it possible to display pure black and white images on a color display.
Before you can use images, they must be converted to a C-compatible notation. This can be done with the following tools:
- Image2LCD - 1Bit-Bild (C-Code)
Scan mode: Set to Horizontal
Bit order: Setting to MSB first
- GIMP - XBitmap image (XBM file)
Scan mode: Fix horizontal
Bit order: Fix LSB fist
The images are stored directly in the source code as an array structure and can be accessed and displayed via a variable in the code. The C code for an icon as an XBitmap image is shown here as an example.
static unsigned char xbm_icon[] PROGMEM = {
   0x00, 0x00, 0xe0, 0x01, 0x18, 0x06, 0x04, 0x08, 0x04, 0x08, 0x02, 0x10,
   0xf2, 0x13, 0xf2, 0x13, 0x02, 0x10, 0x04, 0x08, 0x04, 0x0c, 0x18, 0x1e,
   0xe0, 0x39, 0x00, 0x70, 0x00, 0xe0, 0x00, 0xc0 };
The actual image can be used as a hex array under the name (xbm_icon).
displayDrawBitmap(x, y, image1Bit, width, hight, color);                        // Draw 1Bit b&w bitmap image (MSB first) on e-paper display or TFT display
getdisplay().drawXBitmap(x, y, imageXBitmap, width, height, color);     // Draw XBitmap image (LSB first) on e-paper display or TFT display
The following function can be used for colored images with 64,000 colors according to the RGB565 standard.
drawRgb565Image(x, y, imageRGB565, width, height);    // Draw a RGB565 image (LSB first)
createRgb565StripeImage(imageRGB565, width, height);  // Create a stripe image as test image (LSB first)
Special functions
The special functions enable display-specific actions that must be handled differently depending on the display technology. These functions are used to initialize the display functions and are called centrally in obp60task.cpp and in OBP60Extensions.ccp, depending on the display type used. The commands are not used in the code of a display page.
E-Paper-Display
getdisplay().init(115200);      // Display init
getdisplay().setRotation(0);    // Set display orientation
getdisplay().powerOff();        // Activae StandBy mode
getdisplay().fillScreen(color); // Clear screen or fill screen with a color
TFT-Display
getpaneldisplay().init();               // Display init
getpaneldisplay().setRotation(0);       // Set display orientation
getpaneldisplay().powerSave(true);      // Activate power save mode
getpaneldisplay().fillScreen(color);    // Clear screen or fill screen with a color
getpaneldisplay().setPanelOffset(x, y); // Set panel offset for display
Display update functions
The functions displayFirstPage() and displayNextPage() control the updating of the display content and follow a page-based rendering concept, as used in e-paper displays. With TFT color displays, output is usually done directly by writing to the framebuffer of the display controller, so this method is not strictly necessary. Nevertheless, the functions are retained for compatibility reasons.
The rendering process occurs in two steps: First, the image data is generated using graphics commands. Then, the displayNextPage() function transfers this data to the framebuffer and performs the actual screen update. This approach enables a standardized display of content for different display types and a clear separation between rendering and display updates.
The functions displaySetFullWindow() and displaySetPartialWindow() are also used with TFT displays for compatibility reasons. However, the display content is not refreshed, as this is not necessary with TFT displays. Nevertheless, these commands must still be used in the code of a display page to ensure consistent display behavior across all display types.
displayFirstPage();     // Show fist display content
displayNextPage();      // Show next display content
displaySetFullWindow(); // Full display refresh for e-paper display
displaySetPartialWindow(x, y, width, height); // Partial display refresh for e-paper display